Enter the code DIYDAD10 at checkout to apply your discount. Discount will be applied at checkout when the code is entered & applies to all parts. Cannot be combined with any other coupon or special offer & cannot be applied to a previously placed order. Not valid toward tax or shipping & handling. Discount has no cash value. Discount expires on June 17 at 11:59pm EST.
You've Got 10% Off Your First Order!Save 10% with code at checkout *click to copy coupon code
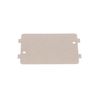
This turntable tray is for microwaves.
Turntable tray rotates in the center of the microwave to help ensure the food cooks evenly.
Follow the instructions in the owner's manual when installing this part.
$149.81
In Stock
Order within the next 14 mins and your part ships today!
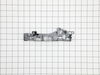
This turntable motor is for microwaves.
The turntable motor rotates the glass tray inside the microwave oven.
Because high-voltage capacitors in a microwave can retain a lethal electrical charge...
$114.20
In Stock
Order within the next 14 mins and your part ships today!
We're sorry, but our Q&A experts are temporarily unavailable.
Please check back later if you still haven't found the answer you need.
1 question answered by our experts.
Sort by:
< Prev
1
Next >
Search filter:
Clear Filter
Your search term must have 3 or more characters.
Keep searches simple. Use keywords, e.g. "leaking", "pump", "broken" or "fit".
Sorry, we couldn't find any existing answers that matched.Try using some different or simpler keywords, or submit your new question by using the "Ask a Question" button above!
William
March 14, 2022
How do i remove the control panel
For model number CEB1599SJ1SS
Hello William, Thank you for your inquiry. We have researched the model number and found the following general instructions for you. For safety reasons, since the microwave capacitor can still store electricity even when the microwave is unplugged, it is usually advised that you discharge the capacitor before any attempt at repair. We have included a link on how to do so.
https://www.partselect.com/Microwave+discharge-capacitor+repair.htm
Use a Phillips head screwdriver to unthread the two mounting screws securing the grill at the top of the microwave. Open the microwave door and slide the grill to the left and lift it up to remove it it. Next remove the control panel mounting screw, lift the control panel up to detach. Make a note of the orientation of the wires connecting it to the control board or take a picture of how the wires are connected. Detach the wires (depressing the locking tabs if necessary) and remove the screws securing the grounding wire and set the control panel on a
sturdy surface. Release the ribbon connector now and unthread the mounting
screws securing the main control board to the housing. Once the screws are removed, lift out the board from the control panel housing. To install the new control panel, remove all of the protective coverings and make sure the new switch cable is inserted through the hole in the control board housing then position the control board in the housing. Put the the screws back to secure the ribbon connector, secure the grounding wire to the control board housing and reconnect the remaining wires to the appropriate terminals on the board. Now insert the control panel tabs into the slots in the frame and push the panel down and replace the mounting screw to secure. Insert the tabs on the vent grille into the slots in the frame and slide the grille to the right and rethread the mounting screws. If you need help placing an order, customer service is open 7 days a week. Please feel free to give us a call. We look forward to hearing from you!
1. Take out the case by unscrew 8 screws on the back and side of the case 2. Take out the control panel by unscrew 1 screw on the top and slide up 3. Take out the latch by unscrew 2 screws, and slide out 3 electric switches that clipped on the latch 4. Clip the switches onto the new latch 5. Slide in lever switch into
... Read morelatch 6. Put back the latch 7. Put back the control panel 8. Put back the case
REPLACE SWITCH -STAND ON (NOT THE SWITCH-MONITOR) THERE ARE TWO OF THESE SWITCHES THE TOP ONE WAS DEFECTIVE. THE ON OFF SWITCH BUTTON ON THE SWITCH WAS BROKEN
Slide a Butter knife at left side by open push knob door will open. Then open all screws from top cover push cover top side front way then door locks Bracket have 3 microswitch pulls out switches mark them top medium and bottom. Remove 3 screws holding brackets will come out. On bottom see a Cam has 1/4” holes can holding Saft broken then
... Read more install new door lock bracket install microswitch put 3screw and slide Cam on saft . I put a small screw on saft to hold cam on place. There was no screw . That’s why cam saft was broke. Put top cover tight all the screws and door lock fixed.


 – Part Number: WB24X10146")