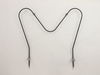
The Oven Bake Element is a black, metal part which supplies heat to the oven. This element is 19-1/2" wide x 18-1/2" long and has 3-1/2" inserts. It is rated as "Easy" to install by users, and attache...
This chrome drip bowl is designed for use with electric cooktops and ranges. This drip bowl is sold individually. At the widest point this part has a diameter of approximately 10 inches. It sits benea...
The drip bowl catches grease and spills that come from cooking on your stove top. They are located under the heating elements. Drip bowls are often neglected and can become rusted and cracked. If your...
This part connects the wire harness to the surface element and is used for ranges. The kit includes interchangeable mounting brackets, ceramic wire nuts, heat shrink protective tubing, and wires. If y...
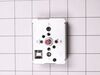
The infinite burner switch controls the stove top eight-inch surface burner, which is the large surface element. If your surface element is not warming up, the element can be tested to determine wheth...
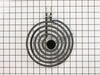
The range surface element provides heat to the cooking surface on top of the range. The element has a universal plug, is 8 inches in diameter, spans 5 coils in width and reaches 2600 watts. Before you...
This element is a genuine OEM replacement part, has looped terminal ends, comes with a black medallion center, and fits most electric ranges. All burners are made of a heating wire that produces heat ...
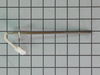
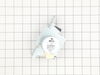
This genuine OEM oven probe is also known as an oven temperature sensor or range probe. This part is manufactured for a range, stove, or oven to detect the temperature within the oven cavity. The prob...
This OEM 40 watt appliance light bulb is used for some ranges, refrigerators, freezers, and microwaves. Simply locate the existing bulb, unscrew it from its socket, and replace with new light bulb. If...
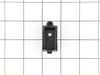
This is a part for your range. This switch controls the stovetop surface burner. If you notice that your stove top is not turning on or is not adjusting to the corresponding desired heat, it is mostly...
This part is found inside your oven. This oven rack comes in the color chrome and measures 24 inches in width and 16 inches in length. This is an extremely simple repair that requires no tools. The pa...
The Frigidaire light bulb lens covers the interior light bulb in an oven. No tools are necessary to replace this item. After unplugging the appliance, slide off the wire bracket to remove the existing...
$10.92
In Stock
Questions And Answers for 79094142310
We're sorry, but our Q&A experts are temporarily unavailable.
Please check back later if you still haven't found the answer you need.
4 questions answered by our experts.
Sort by:
< Prev
1
Next >
Search filter:
Clear Filter
Your search term must have 3 or more characters.
Keep searches simple. Use keywords, e.g. "leaking", "pump", "broken" or "fit".
Sorry, we couldn't find any existing answers that matched.Try using some different or simpler keywords, or submit your new question by using the "Ask a Question" button above!
Jim
July 4, 2022
The coils will sometimes get so hot, they'll glow red even though the dial is set at medium. Sometimes it does it, sometimes it doesn't. What will fix this? Also, the digital clock doesn't display right after i set it. Oven temp and timer still display but not the clock. What parts do i need to repair these problems. Thanks in advance, jim
For model number 79094142310
Hi Jim,
Thank you for your question. If the clock does not appear on the the display, you will need to replace the electronic control board. The part number listed under your model number for the electronic control board is FIX8689401. If you need help placing an order for it, customer service is open 7 days a week and anyone will be happy to assist you. Please feel free to give us a call. We look forward to hearing from you!
Landlord brought me used oven with no directions to it. Can't figure out how to set clock.can you help me?
For model number 79094142310
Hello Karen, thank you for the great question. When the appliance is first powered up or when the power supply to the appliance has been interrupted, 12:00 will flash in the display. The time of day must first be set before operating the oven. To set the clock, press the Set Clock button once. CLO appears in the display. The time is displayed when you press the up or down arrow keys. Continue to hold the arrow key until the correct time of day appears on the display. Press the start button to accept the time of day. We hope this information helps!
Was this helpful?
Thank you for voting!
Sal
December 9, 2023
8" surface element glows/gets way too hot regardless of the surface dial setting. What could be the problem/s.
For model number 79094142310
Hi Sal, thank you for writing in. Our research has found, if your burner barely heats or stays on high heat, no matter how you set the temperature, the problem could be the infinite switch, part number PS1145040. This switch is attached to the knob you use to turn on the stove burner. We have attached a video to assist you. We hope this helps.
I have the model number and have ordered these pans before, but now they can't find a match for my model #VF45007259 or serial number#79094142310
For model number 79094142310
Hi Jackie, thank you for reaching out! If you are looking for the burner drip pans, the part number for the 8" is PS437595, and for the 6" is PS437596. And if you are looking for the broiler pan and grate insert, the part number is PS9864838. Customer service is available 7 days a week if you need help placing an order!
1. Removed two screws, pulled out the element, voltage tested the element and determined it was an open circuit (bad element). 2. Ordered the part from partselect.com 3. Disconnected element, connected the new one, and screwed it back in.
Shut off circuit breaker to stove and collected the tool from the basement. Turned on flashlight. Unscrewed the two hex nuts from the old element/back of the oven. Slid the old element prongs out of the back, exposing the connecting wires. Pulled the connecting wires off of the old element, carefully, so that the connections wouldn
... Read more't come off of the wires. Threw the old element pieces in the garbage. Connected the new element to the connecting wires and re-fastened the hex nuts. My husband had wanted to call the repair man, but it didn't look too difficult, so I decided to try it on my own. Boy was he surprised when I fixed it, and for a fraction of the cost of hiring a repairman! Ladies, we can do this ourselves!!! :) Thank you for being there for us to order our part from, Parts Select, we had our new part in less than 24 hours, so the shipping was blazing fast!!! Keep up the good work!!! :)