Microwave Oven Combo Seals and Gaskets

Popular Microwave Oven Combo Seals and Gaskets

Your Price
$9.78
  In Stock
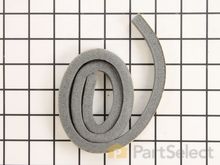
Microwave Oven Combo Lint Trap Housing Seal
★★★★★
★★★★★
8 Reviews
PartSelect Number PS11741506
Manufacturer Part Number WP339956
This is foam seal for your dryer. It forms a seal to prevent air from escaping the rear of the dryer drum and the lint duct. This model comes with adhesive backing and is located in between the lint chute and the bulkhead of your appliance. This foam seal is just over 28 inches long and under 1 inch wide. You may need to replace this part if your clothing is taking too long to dry, or if your dryer is not generating enough heat or no heat at all.
Fixes these symptoms
Installation Instructions
Eric from Fort Dodge, IA
dryer drum not turning and no air circulating
replaced motor and drum rear seal as well as idler wheels, the old rear drum seal was completly worn out, since I had it all apart, I replaced lint chute and trap seals and belt and tensioner. I spent less money on parts than if I would have bought a new dryer. The motor was the main problem as the bearings were shot. Read more...
Your Price
$87.39
  In Stock
Microwave Oven Combo Door Gasket
★★★★★
★★★★★
15 Reviews
PartSelect Number PS11749287
Manufacturer Part Number WPW10162384
The oven door gasket on your range functions as a seal between the warm interior of your oven, and the outside. It prevents heat from fleeing your oven when the door is closed. Before making any repairs to your oven you should make sure to wear work gloves to protect your hands, and give your oven time to cool. The only tool you will need to make this repair is a pair of needle nose pliers. This oven door gasket comes with built in retaining clips; if any retaining clips from your old gasket are left in the oven make sure to remove them before installing your new gasket.
Fixes these symptoms
  • Door won’t close
  • Little to no heat when baking
  • Oven is too hot
  • See more...
Installation Instructions
Lori from Scottsdale, AZ
Needed to replace oven door gasket.
First removed the old gasket using a needle-nose pliers. Then placed new gasket by inserting the little clips on the gasket. Took 5 minutes. Great instructions from Repair Forum. Read more...
Your Price
$11.16
  In Stock
Microwave Oven Combo Light Gasket
★★★★★
★★★★★
5 Reviews
PartSelect Number PS11740863
Manufacturer Part Number WP3184533
This part creates a seal around the light lens and bulb.
Installation Instructions
David from Westminster, CO
Fiber Gasket around Pyrex Light Lens was mis-shaped
All I had to do was unscrew the pyrex lens over the oven light and then remove the old gasket and replace it with the new one. Worked like a champ! Read more...
Your Price
$52.88
  In Stock
Microwave Oven Combo Door Gasket
★★★★★
★★★★★
11 Reviews
PartSelect Number PS1019820
Manufacturer Part Number WB04T10050
This oven door gasket prevents heat from escaping the oven cavity when in use.
Fixes these symptoms
Installation Instructions
mary from MODESTO, CA
replaced gasket on oven door
followed video exactly Read more...
Your Price
$11.16
  In Stock
Microwave Oven Combo SPACER
★★★★★
★★★★★
2 Reviews
PartSelect Number PS392038
Manufacturer Part Number 8184109
Waterproof seal.
Fixes these symptoms
Your Price
$127.31
  In Stock
Microwave Oven Combo Oven Door Seal
★★★★★
★★★★★
5 Reviews
PartSelect Number PS11757564
Manufacturer Part Number WPY702338
This oven door seal prevents heat from escaping the oven cavity when in use.
Fixes these symptoms
  • Little to no heat when baking
  • Oven not heating evenly
  • See more...
Installation Instructions
Paul from Mickleton, NJ
The oven door seal was ripped and was leaking.
The oven seal replacement was very straight forward. Two screws held the door to the arms coming from the oven. I slid the door up off the arm and moved it to a workbench. This whole process should take about 15 minutes, a little longer if your unit is older and you want to clean as you go. Mine was fairly dirty and I gave it a cleaning as I removed parts. Unscrew all screws on the outer frame of the door, including two small ones on the side. Remove the outer frame and then the glass front and set them aside. A few more screws to remove the glass from the inner door, and even more on the remaining part of the door. You should also remove the screws holding the tiny brackets as well to release the portion that holds the oven seal in place. This is very straightforward, just keep pulling screws out until you can remove the old seal.

Once the old seal is out, insert the new one using the wire embedded in the seal as your guide...the gap in the seal goes to the bottom. Put everything back together and re-install the door. My door hinges were spring loaded and took a little effort to move them down so the door can be slipped on. This is a two person job since the hinges do not lock in place, they spring right back up flush with the oven and you cannot install the door. Re-install the two set screws holding the door to the hinges and you are done!

With the new seal in place, it felt a little puffy and the door did not seem to close as flush as it used to. This makes sense since the seal is new. I kept the door locked (like you would to use the oven cleaning cycle). I even kept it partially locked during cooking.

Frankly, the hardest part was the cleanup of nasty grease and dirt that built up over the past decade or so.

Best of luck!
Read more...
Your Price
$91.31
  In Stock
Microwave Oven Combo GASKET-OVN
★★★★★
★★★★★
1 Review
PartSelect Number PS11731331
Manufacturer Part Number W10856596
Installation Instructions
Fred from Greenport, NY
oven door gasket got leaked on from a hole in a pan in the oven above.
This is an oven gasket that 'snaps' in place - no tools, no problems, no 'brains' needed :) Read more...
Your Price
$69.67
  In Stock
Microwave Oven Combo GASKET OVN Door
★★★★★
★★★★★
1 Review
PartSelect Number PS783572
Manufacturer Part Number WB32T10012
Installation Instructions
Harold from BEVERLY HILLS, MI
Needed new gasket
A very simple remove the old one and replace with the new one.
Only tool needed was needle nose pliers to remove old clips..
Read more...
Your Price
$24.93
  Special Order
Microwave Oven Combo SEAL
PartSelect Number PS10061106
Manufacturer Part Number 00771184
Installation Instructions
WEST from RIDGECREST, CA
Right hinge failed - return spring broken
I installed a new right hinge (PartSelect part number PS10060784), since the integrated return spring failed.
To remove the door, I made two of the special tools required in the Bosch repair manual. I fabricated two square pieces of aluminum, about 30mm on a side and ¼” thick. With the door open (it is horizontal) you place one square in each of the cavities that the hinges close into and close the door far enough that the squares take up the force of the springs and allow you to lift the door out. Of course, if one spring is broken, you will not need a square on that side to remove the door but will need it later to install the door with the new hinge. In fact, I installed the square in the replacement hinge before I installed the hinge in the door.
Next remove the ventilation duct (Part number PS8770410). There are three screws. When re-installing the duct later, do not overtighten the screws, because they can pull through the duct. This will require longer screws and small flat washers to repair (‘don’t ask me how I know’).
The next step is to remove the plastic cover (PartSelect part number PS11705124). It will be impossible to save the plastic cover (‘don’t ask me how I know’). Purchase a new one ahead of time. It will be easier to not scratch the door if you recognize that you are going to destroy the cover.
When removing the plastic cover, pieces of some of the tabs that hold the cover in place will break off. The broken-off pieces of the tabs that fit into cavities at the top of the door may remain in the cavities. IF YOU DO NOT PICK OUT THOSE PIECES, THE NEW COVER WILL NOT SNAP HOME DUE TO THE PRESENCE OF THE BROKEN PIECES. You will break the new cover in removing it to figure out why it wouldn’t snap home and will have the pleasure of purchasing a second new cover (‘don’t ask me now I know’).
Also, when removing the cover try not to bend the metal fingers of the frame (part number PS8770415), particularly along the top of the door. It is important that the gap between the metal fingers and the frame holding the glass be correct, since that is where the seal (part number PS10061106) must fit when replacing the cover. On the other hand, if the metal fingers are bent too far away from the frame holding the glass, the cover will not line up with the cavities along the top where the tabs go home. It will be easier to protect the metal fingers if you recognize that you will be destroying the cover when you remove it.
I did pinch and damage the seal when trying to force the first new cover in place (it didn’t go home, as described above), and had the pleasure of purchasing another seal (currently unavailable). You only get one chance per cover.
Once the cover is removed the frame can be removed from the outer door by removing the screws holding the two parts together.

Next, replace the spring.

Next re-attach the frame to the outer door.

Next, be sure the seal is positioned correctly on the cover. The seal has a flap that holds it in place on the cover, such that the seal will be pulled into place when installing the cover. This is essential, since you will not be able to reposition the seal once the cover snaps home (particularly along the top of the door).

Now, carefully position the cover so that it is going to remain parallel with the door when you push it home. You do not want the cover to be cocked, since the seal may not install correctly. Be sure all the tabs are falling into place as you install the cover. Hopefully, the tabs will all snap into place and the seal will stay in place.

Replace the door by feeding the hinges into place with the squares still installed. Open the door fully and remove the squares. The door will close correctly if the hinges are placed correctly. This may take several tries.

Finally, microwave yourself a fresh cup of coffee or other beverage.

This door is not meant to be repaired, in my opinion. I believe Bosch offers only the option of buying a new door. A DIY repair is not risk free.
Read more...
Your Price
$102.90
  In Stock
Microwave Oven Combo SEAL- DOOR
★★★★★
★★★★★
6 Reviews
PartSelect Number PS11743859
Manufacturer Part Number WP71001841
This oven door gasket prevents heat from escaping the oven cavity when in use. This is a very easy repair that should only take a few minutes. The door gasket may damage or rip over time due to repeated use. If you notice that hot air is escaping from your oven, it is likely that the gasket needs to be replaced. You will need to open the oven door and remove the old seal by pulling it out of place with your hands. The old gasket will be secured with clips that will come out when you pull the entire piece out. The new gasket will have hooks all along the rim, which will line up with the oven door. Simply line up the hooks and push into place outlining the door of the inside of the oven. No tools required.
Fixes these symptoms
  • Door won’t close
  • Oven not heating evenly
  • See more...
Installation Instructions
cheryl from dolores, CO
oven door gasket was no longer flexible, but stiff
pulled out the old door gasket, it had little diamond-shaped clips, pulled out really easily, replaced with the new gasket. All the clips fit into the proper holes, stuffed the new ends where the old ones were. Perfect. less than 10 minutes. Thanks.... Read more...

Microwave Oven Combo Seal or Gasket Brands