This clip ensures that the knob is securely fastened to the control shaft, allowing you to properly select the correct time and setting for your dryer. If your dryer will not start or shut off, the ti...
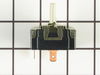
This rear drum bearing kit includes a shaft, ground strap, bearing, seven screws, and installation instructions. The bearing plate comes with a slot in it for the ground strap. This part helps keep yo...
$88.34
In Stock
Order within the next 12 hrs and your part ships today!
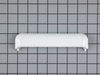
This slide is sold individually. Some dryers require up to three of these slides . Be sure to check to make sure you order the necessary amount for your dryer.
$21.08
In Stock
Order within the next 12 hrs and your part ships today!
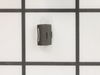
This door latch is designed for your dryer, and is mounted to the dryer frame. The door latch holds the door of your dryer closed while the machine is operating. If your dryer door is not catching on ...
$11.40
In Stock
Order within the next 12 hrs and your part ships today!
TThe door strike for your dryer is mounted on the dryer frame that the door shuts onto. It fits into the door catch on the door and keeps the door closed. If the door strike is damaged or missing, the...
$8.56
In Stock
Order within the next 12 hrs and your part ships today!
The adjustable leveling screws on the bottom of your dryer can be screwed in or out to lower or raise the leg level. If one of the leveling screws is stripped, damaged, or missing, you may not be able...
$16.54
In Stock
Order within the next 12 hrs and your part ships today!
Questions And Answers for NVLR333ET0WB
We're sorry, but our Q&A experts are temporarily unavailable.
Please check back later if you still haven't found the answer you need.
6 questions answered by our experts.
Sort by:
< Prev
1
2
Next >
Search filter:
Clear Filter
Your search term must have 3 or more characters.
Keep searches simple. Use keywords, e.g. "leaking", "pump", "broken" or "fit".
Sorry, we couldn't find any existing answers that matched.Try using some different or simpler keywords, or submit your new question by using the "Ask a Question" button above!
Linda
July 15, 2021
Start just humms. How do i take the top off?
For model number NVLR333ET0WB
Hi Linda,
Thank you for your question. If you start the dryer and it just hums, open the dryer door and reach in and turn the dryer drum counter-clockwise a couple of times. Once you have done this, shut the door and see if the dryer starts, if it does not start, then there is an issue with the motor and it will need to be replaced. Here is a link to one of our YouTube videos that you may reference on how to disassemble a GE dryer, https://www.youtube.com/watch?v=qW8cfuUTWqk. The dryer in the video may be different from yours, but it will give you a general idea on how to remove the part. We hope this helps! Good luck with the repair!
How do I find out the age of my dryer serial# fs231046h
For model number NVLR333ET0WB
Hello Wes, Thank you for the question. According to the serial number this product may have been manufactured March of 1985 or 1997 or 2009 or 2021. We hope this helps!
2 people found this helpful.
Was this helpful?
Thank you for voting!
Dennis
February 28, 2023
I have a Hotpoint NVLR333ET0WB clothes dryer. It has 3 cycles. One is timed cycle with no heat and there are two auto cycles, one with med heat and one with high heat. The timed cycle works. The auto cycles no longer advance. It starts fine and heats, but it does not advance, go through cool down and shut off. It just sits where you set it and heats and spins. My guess is there is some form of humidity sensor that should tell it to advance as the clothes dry, however I cannot tell from the parts breakdown what part may be the issue. Can you help troubleshoot?
For model number NVLR333ET0WB
Hi Dennis, thank you for getting in touch. Based on our research, if your cycle does not advance after heating, it is possible that your high-limit thermostat, part number PS268083, is malfunctioning. The malfunctioning high-limit thermostat does not turn off the heat after the heat cycle and ultimately control board does not get the signal to initiate the next cycle. In this case, we have to replace the thermostat. Another probability is that the heating element, part number PS265613, is not giving an adequate amount of heat necessary to force the thermostat to cut out the excess heat from the heating element and proceed to the next cycle. If this is not the case, you may have a faulty timer, PS268298, that needs replacement. We hope this information helps!
The machine starts and the tumbler works, however the timer does not work and it does not heat either.
For model number NVLR333ET0WB
Hi Bill, thank you for reaching out. Based on the description that you have provided, we would recommend replacing the timer, part number PS1992601, to fix this issue. We hope this is helpful!
The dryer does not heat. Could this be the healing element needs replacing?
For model number NVLR333ET0WB
Hello Elizabeth, thank you for contacting us. Based on the description that you have provided, we would recommend checking the thermal fuse, part number PS268245, to solve the problem. It shuts off the heating element when the dryer overheats. Glad to be of assistance!
first I took the dryer apart 1st thing i did was unplug the power supply (safety first) then I removed the top of the unit then removed the front cleaned all the lint from the inside of the cabinet I found the proper belt size on part select.com the next day I had my dryer belt delivered (which cost 1/3 the price of the local repair shop
... Read moreprice) then I placed the belt over the dryer drum and made sure it was in the general location it should be I then replaced the front cover and the top. then I removed the rear cover which was held on by six 5/16 sheet metal screws which gave me access to the drive pulley and belt tensioner the belt goes on by going under the tensioner then around the drive pulley Then i rotated the drum by hand to make sure everything had clearance I then buttend everything up plugged it and started it up it workd fine and I figure Ill get another 8 years out of it Thank you partselect.com
First I unplugged the dryer, then I removed the access panel on the back of the control panel. I removed the wires from the back of the switch...Here is where I messed up. I removed the switch prior to ordering the part, the bad part is the way I removed the part. When you get the new part in you will be able to see how it will be mounted
... Read more to the control panel. I had no idea, so I did what was necessary to remove it. Needless to say, I bent the hell out of the hole that the switch mounts in. In turn, the installation of the new switch did not go as easily as I would have liked. After straightening out some metal and drowning the thing in epoxy, the new switch is installed. I hooked the wires back up on the back of the switch, plug in the dryer, and dry some clothes. Standing victorious over the dryer with beer in hand, not only did I accomplish the mission but I learned my lesson... destructive removal = BAD!
had to remove top of dryer 2 phillops screws at top in the door opening. flip top out of way take 2 screws out of insides that hold the front on. un hook all plugs and remove front of dryer. once u have did this you need to remove the drum by pulling it out of the bearing in the back un hook the belt from the motor and remove the drum thi
... Read mores should expose the element 4 screws and 3 wire to remove it. installation is the same