Jenn-Air Microwave Oven Combo Lights and Bulbs

Jenn-Air Appliance Parts

Popular Jenn-Air Microwave Oven Combo Lights and Bulbs

Your Price
$8.89
  In Stock
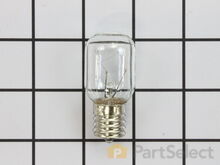
Jenn-Air Microwave Oven Combo Light Bulb - 40W
★★★★★
★★★★★
157 Reviews
PartSelect Number PS2376034
Manufacturer Part Number 8206232A
This 40w light bulb is a replacement bulb constructed of glass and metal. It is an easy-to-install electrical part which produces 40w of light. If the bulb won't light up then it may be broken and should be replaced. The bulb attaches directly to an appropriate light socket and has a small screw-in base. To access the exterior light bulb, you will need to remove the panel on the bottom of the microwave using a Phillips screwdriver. If your exterior light bulb has not been changed before, it is probably held in place with some silicone. You will need to cut away this silicone to remove the old bulb. If you cannot access the silicone with a utility knife, it can be removed using dental floss. Once the silicone is removed, simply unscrew the old bulb, and replace it with the new one. Be sure to disconnect the power to the microwave before you begin this repair. This light bulb measures about 1 1/8 inches. We do not recommend using a higher-wattage bulb for this appliance, and can only recommend this specific bulb. If fixing the bulb does not solve your microwave light issue, it's possibly a problem with the socket, which means the socket and/or board will need to be replaced. This can be a more dangerous repair, so consult your user manual or a technician before attempting.
Installation Instructions
Chris from Cedar Hill, TX
Burned out light under microwave and Filters needed changing
I just removed the multiple screws which held the hood cover on. I then attempted to remove the light bulbs from the socket. This proved impossible because the bulbs were so fragile from the heat and grease build up. To make this task much easier and probably safer, just replace the bulb housing and light bulb. The bulb housing unplugs very easily. Just replace it then screw your new bulb in. P.S. Be sure to unplug appliance before you start.

The filters are very easy to replace. No tools needed.

Hope this helps.
Read more...
Your Price
$11.75
  In Stock
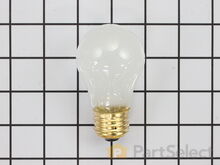
Jenn-Air Microwave Oven Combo Light Bulb - 40W
★★★★★
★★★★★
66 Reviews
PartSelect Number PS884734
Manufacturer Part Number 8009
This an authentic OEM 40-Watt replacement light bulb, used in a number of household appliances. It is specially designed to withstand extreme temperatures, which is why these replacement bulbs are most often used to light the inside of refrigerators and ranges. It features a standard socket base, which means you simply unscrew the burnt-out bulb and screw in the replacement. Depending on the appliance you may require a screwdriver or nut driver to access the light bulb. We recommend you wear work gloves while handling this replacement part. It is constructed of glass and metal and is sold individually. Depending on the appliance and location of the bulb within it, you may want to consider disconnecting power and using a flashlight for easier access to unscrewing and re-screwing in your bulb during this repair.
Installation Instructions
judie from mays landing, NJ
interior drawers were off their rollers
pulled the washer out and replaces the top roller system on both sides and the replaced the weels and brackets on the bottom drwaer. however i had trouble putting the dish washer back correctly and had to call a repairman to adjust the dishwasher and alighn it to open and close properly. but i did do good inside. i feel it was easy and a success. thank you for having the supplies for us to attempt to repair it on our own. Read more...
Your Price
$25.81
  In Stock
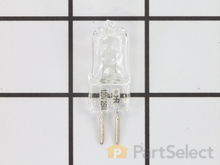
Jenn-Air Microwave Oven Combo Bi-Pin Halogen Bulb
★★★★★
★★★★★
11 Reviews
PartSelect Number PS11744355
Manufacturer Part Number WP74009925
This part is a replacement halogen lamp for your oven. The bulb is 25 watts and 120 volts. If your light bulb is burned out, this is the part that replaces it. Be sure to turn off power to your range hood before you begin this repair. This bulb is sold individually and is a genuine OEM part sourced directly from the manufacturer.
Installation Instructions
Thomas from Rydal, GA
inoperative ignitor and a dead light bulb
I took out the old and replaced with the new. The hardest part was getting that tiny halogen bulb in that tiny little hole. It took longer to take the oven racks out and put them back in than to make the repairs. Read more...
Your Price
$64.56
  In Stock
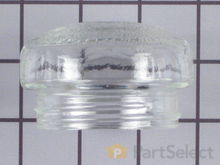
Jenn-Air Microwave Oven Combo Light Cover Lens
★★★★★
★★★★★
7 Reviews
PartSelect Number PS11747414
Manufacturer Part Number WP9781049
The light cover lens in your oven is designed to protect the light bulb. If your light cover lens is damaged, you will need to replace it. This part is made of clear glass and is roughly 3 inches in diameter. Many of our customers have rated this repair as easy, and it should take less than 10 minutes to complete. In order to do this repair, simply unscrew the old light cover lens, and replace it with the new one. If your old light cover lens is damaged, be careful of any broken glass when completing this repair.
Installation Instructions
Jim from Placentia, CA
Oven (not broiler) element burned out, no oven heat
Inside the oven, I removed one Phillips screw on each side where the element mounts to the back oven wall. Then disconnected the wire on each side using pliers. Unscrewed glass lens, unscrewed light bulb. Replaced all pieces in reverse order. Took less than 10 minutes. Read more...
Your Price
$38.86
  In Stock
Jenn-Air Microwave Oven Combo Light Bulb
★★★★★
★★★★★
3 Reviews
PartSelect Number PS11745088
Manufacturer Part Number WP8183592
Sold individually.
Installation Instructions
Stephen from Cottonwood, AZ
Light bulb burned out.
Found instruction on internet,
1. Remove anit-tampering screws with punch and hammer
2. Remove the rest of the screws
3. Removed cover
4. Remove burned out bulb and installed new one
5. INstalled cover
6. Installed screws including the anti tampering onces
7. Op tested unit.
Wife is happy.
Read more...
Your Price
$81.53
  In Stock
Jenn-Air Microwave Oven Combo Oven Light
★★★★★
★★★★★
3 Reviews
PartSelect Number PS11744440
Manufacturer Part Number WP74011278
This oven light assembly is a little over four inches long and comes with the lens and 660-watt light bulb. Make sure your appliance is unplugged or circuit breaker is off before installing this new part. It is located inside the oven and may need to be replaced if the socket has failed, causing the light to not come on inside the oven. It may also need to be replaced if you notice that the glass is broken and the whole assembly needs to be replaced. The part is located in the upper right hand side of the oven. To reach the bulb you will need to open the oven door and remove the upper rack.
Installation Instructions
robert from chatham, VA
hard to get old one out
easy to put in Read more...
Your Price
$55.86
  In Stock
Jenn-Air Microwave Oven Combo Indicator Light Kit
PartSelect Number PS2079029
Manufacturer Part Number 715396K
This indicator light kit comes with two red jewel light lenses.
Installation Instructions
Janellen from Aiken, SC
blower motor died
Pulled the motor and blower wheel from below. Replaced both. I think it was easier to replace the two together than just the motor.I also had old light indicators so we replaced them since the stove was sort of apart. The repair was not difficult at all, and my 30+ stove top looks and runs great! Read more...
Your Price
$16.73
  On Order
Jenn-Air Microwave Oven Combo Light Cover Lens
PartSelect Number PS11744069
Manufacturer Part Number WP74004607
Your Price
$54.01
  On Order
Jenn-Air Microwave Oven Combo Light Bulb - 120v 25w
★★★★★
★★★★★
3 Reviews
PartSelect Number PS11747808
Manufacturer Part Number WPA3167501
This is a 120 volt, 25-watt light bulb that fits a variety of medium to large kitchen appliances. It functions by illuminating when the appliance door is open. It has a small base with a twist lock. This part is sold individually. This is a common wear part, so it is recommended order a spare and to check other appliance light bulbs in your home. This is an authentic OEM part that is sourced directly from the genuine manufacturer. Be careful when handling the light bulb; use a pair of needle nose pliers to remove the base if the glass bulb is broken.
Installation Instructions
Thomas from Oneonta, NY
Dryer made a loud noise and vibrated badly
First I made sure the unit was unplugged. I popped the top of the unit with a slotted screw driver, lifted the top up and rested it against the wall behind the dryer. I removed the two screws - one on each side in front on top of the dryer cabinet. Then I tipped back the front panel of the dryer slightly with the door of the dryer closed. I unclipped the door switch with a slotted screw driver and then lifted the entire front panel including the door off of the the two floor clips on bottom. I set the front panel aside. Next I lifted the large drum slightly to dislodge the rollers in back and slid the drum back slowly while sliding the thin belt back on the drum until the drum was out of the unit and the belt was detached and loose. Then I cleaned the unit thoroughly, vacuumed all lint and dirt and wiped down the outside of the large drum with mineral spirits to make sure it was totally clean and smooth. Then I removed the two rollers and the roller shafts at the back of the unit following the directions enclosed. My slip-ring pliers came in handy to remove the retaining rings on the roller shafts. I replaced the rollers and roller shafts and the supplied washers and spacers as per the instructions. I sprayed a little WD-40 on the surface of the rollers and it stopped all squeaking and vibration of the drum. Next I replaced the front drum pads and runners as per the instructions. I then slid the drum back in place taking care to slide the new belt back around the drum in the same position as the old belt. Now came the difficult part - laying on the floor and reaching under the drum I positioned the belt around the motor shaft and tension pulley. This must be done by "feel" and must be done correctly!! Follow the instructions on the positioning of the belt very carefully and make sure it is in the correct position on the drum, motor shaft, and tension pulley! Next, get up and rock the drum up and down slightly to make sure it has engaged the two rear rollers properly. Rotate the drum manually one or two turns to make sure the belt is in the correct position. Then replace the front door panel by dropping it onto the two clips at the base of the unit and taking care to replace the door switch in reverse order of taking it out. Then replace the two screws at the top front on each side of the unit to secure the front panel. Lower the top of the unit back in place, plug in the dryer, turn it on and enjoy the lack of noise you have created. Read more...
Your Price
$10.33
  In Stock
Jenn-Air Microwave Oven Combo Lock Indicator Light
PartSelect Number PS11746835
Manufacturer Part Number WP903115
Installation Instructions
Rodney from Thibodaux, LA
Infinite switch malfuctioning and indicator light not working.
I changed out the infinite switch without any problems. The indicator light was another problem. It wasn't the light that was bad, it was the indicator light lens that snaps into the panel. The light then attaches to the lense. The lense broke and the indicator light pulled away with the tension on the wires. Now I have to order replacement lens and will have a spare indicator light. Read more...

Related Jenn-Air Microwave Oven Combo Parts